Pages

Tuesday 26 November 2013

Production Diary 12 - Creating the contents page and equipment task

25th and 26th November 2013

(25th)

(26th)

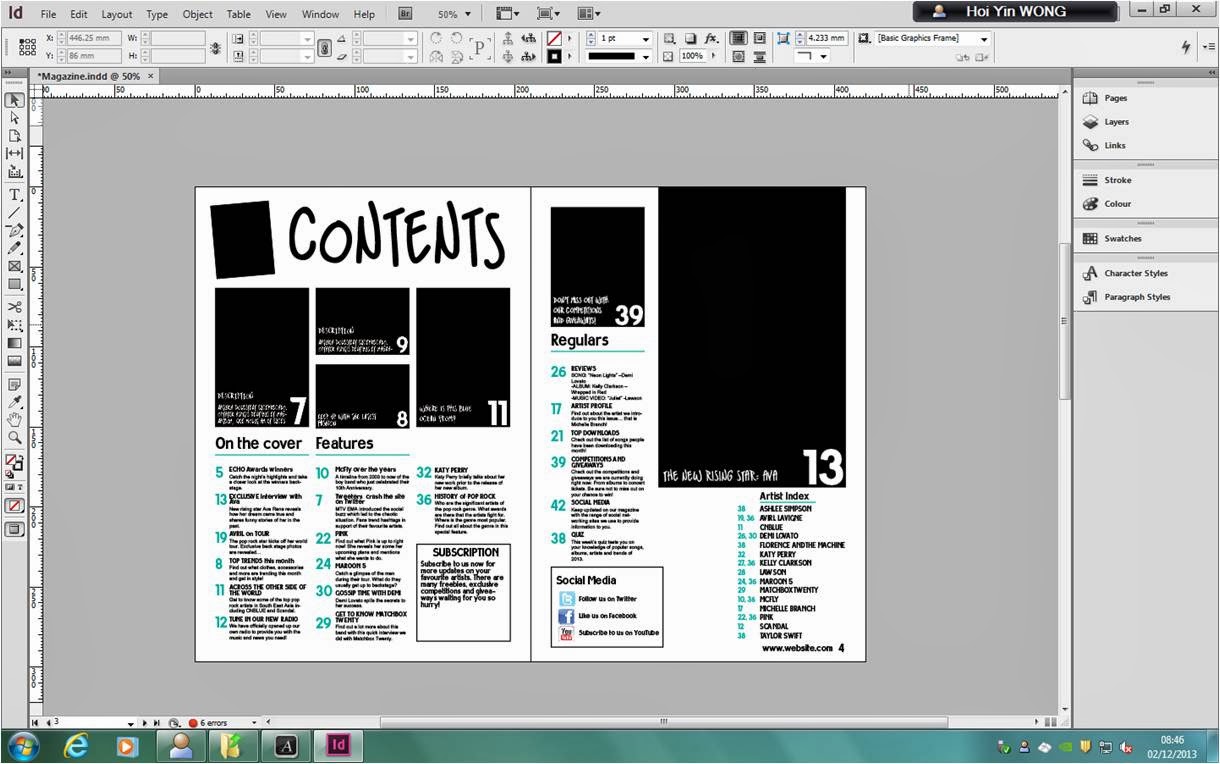
This week I started actually putting in the information in my contents page. I first typed in the different subheadings of on the cover, features and regulars. I then pasted in the contents list I had made previously. I changed the size of it and adjusted the line spacing to a suitable number so that it was organised. I also changed the colour of the numbers to teal which I decided to use as the main colour for the colour scheme of my magazine.

I also pasted in the artist index and subscription box text. I changed some of the positions of the boxes around so that things fitted nicely on the page. I put the social media box on the left page and moved the subscription box to the left side of the right page so I could put the artist index on the right side of the right page. I placed in images of the Facebook, Twitter and YouTube logo in the social media box. I resized them so that they were all the same size and then positioned them in line with each other.

I decided some of the things I wanted to be shown with an image. I altered the position of the numbers on the images and added in a short description of the image.

I also added in paragraph rules to the subheading to make it look more interesting. I chose to have one line under the text which is teal (the main colour of my colour scheme).

For homework I did the task on equipment. For this task we had to write about the equipment we will use to create out magazine which include both software and hardware. For software, I wrote about using Adobe In Design and Photoshop and for hardware, I mentioned camera, lights and tripod. I presented this information on Prezi.

Tuesday 19 November 2013

Production Diary 11 - Creating the layout of the front cover

19th November 2013

As I planned, this week I did the front cover layout. I first did the masthead, then banner and finally the sell lines and other features.

I drew a long thing black box for the banner which I placed at the bottom of the page. I then added in white text over it. This would be an interesting feature which readers would be attracted by.

I then added in the sell lines. I made a variation sell lines; I changed the look of each sell line with different sizes and fonts that I thought would be suitable. For one I had a black box behind the white text to make it stand out from the other sell lines. For another one, I made the number in the sell line much bigger than the text which was also for emphasis. For the main sell line I made it much bigger in size and also a different style of the font I used for other sell lines so that it is bolder and eye-catching.

Another thing I added was a plug. I drew a black circle and then put white text over it. I placed this on the right side which is opposite the sell line with the black box behind it as I want to make a balance of different sell lines on the front cover. This would have competitions or freebies information on it.

I also added in other features such as the barcode, price, issue number and date. I represented these with a black outlined box.

Monday 18 November 2013

Article Text

Media - Article Text by fionawongmedia

Front Cover Layout


I first created a text box and typed in 'masthead'. I placed this at the very top of the page because I think it will be most effective there because it is where people usually look first.

Afterwards, I created the bottom banner by drawing a black box. I then put white text over it. This will be where I put a feature that will likely be interesting to the readers.

I added in textboxes with a black border to represent the barcode, price and issue number and the date.
 
For some of the sell lines I used drew a black box behind each line to make it stand out and look different to the rest of the sell lines. I tilted the top and bottom box as well as this makes it disorientated and look more interesting.

On another sell line I made the number in between the two lines much bigger as this can really draw people's attention. I also changed the line spacing between the lines to make it more compressed together and look like they belonged together.

For the main sell line I used a variation of the font I used for most sell lines which was a 'linocut'. This made the edge of the text more rough and messy which makes it convey a pop/rock effect. In addition to this font variation, the greater font size, made it the next most eye-catching thing after the mast head.

I used a total of two different fonts and created variations of them to make it look more interesting that having the same font all over it. These variations included bold and linocut. In addition I made some of the sell lines in capitals to make it stand out and also indicate that it is the more important part of the sell line.

Thursday 14 November 2013

Double Page Spread Layout


I first drew out the large black box on the right hand side as I knew that I wanted to have a full bleed image on the right hand side. I then drew out another black box on the left hand side of the double page spread. I initially drew one big box but then later decided to have several boxes because I thought that having several images would look better.

I then added in the heading and subheading at the top of the left page. For the heading, I changed the font to one that I had previously downloaded which is called 'Fake Smiths'. I used a very similar font for the subheading called 'Lazy sunday' so that it matches with the heading but is not entirely the same so that it distinguishes the difference between the two -making the heading stand out more than the subheading as I believe the font is bolder and more eye-catching.

For the main text I drew in text boxes in the columns and filled in placeholder text to represent the  text in the article I will have. I made the first paragraph one font size bigger than the rest of the text and also made it bold so that it stands out. In addition, I made the first letter of the paragraph a drop cap 3 lines down; this made the first letter bigger in size which drops down to the 3rd line of text.

After I added in a pull quote in the 3rd column of text. I made the size of the pull quote relatively larger than the text in the article so that it stands out and draws the reader's attention I changed the font to the same font as the one I used for the heading so that it stands out from the article text. I also added in paragraph rules above and below the text. This made a sort of border without the side lines around the pull quote.

The website for my magazine is placed in the same position as it was with my contents page because I placed this on the A-Master page which means it will be in the same position for every page.

Tuesday 12 November 2013

Production Diary 10 - Creating the layout of the double page spread and article text

12th November 2013
 
I finished doing the contents page layout and started on the double page spread layout this week.

I first drew in the black boxes to represent the images like I did for the contents page.
I then added in text for the heading, subheading and the article text I changed the font for the heading and subheading which were different but similar fonts so that they linked but puts emphasis on the heading because it is more bold and eye-catching.
For the article font I made it a different font so that it was more suitable to read as it is much clearer than the font I used for the heading for example as it is slightly disorientated which would make it hard to read.
I also then added in a pull quote in the same font as the heading and subheading so that it stood out but also followed the general style of the article. I made the font size much bigger than the rest of the article text as it needed to stand out to get the reader’s attention. To make it more interesting, I added in paragraph rules which I had been taught. This created two lines above and below the pull quote which makes it look quite impressive compared to just having enlarged text in a different font.

For homework, I did the article text. I first looked at existing articles and got inspiration from it to write my own. I wrote about 1,500 words for the article. I made my article quite informative as my front cover artist is new and so the readers are unlikely to know much about her.

I plan to do the final layout of the front cover next week.


Monday 11 November 2013

Contents Page Layout


I found an example of an existing contents page from Total Film magazine. I decided to use it as a guide to make my own one because I think it is very successful in presenting the information for the readers and so I want my contents page to look similar to that.

I first drew out the black boxes which represented the images and then added in the contents list using place holder text and then the numbers beside it. Afterwards I added in the pages numbers on the images and also a short description next to the page number. I made the page numbers relatively large as I want it to stand out to the readers so they can see straight away what page the article of the image is on.

I chose a couple of fonts for my magazine. I made the title and description of the images as well as the subscriptions and social media box in the same font. For the headings and contents list and numbers I chose a different font which looks neater and is easier to read from.

On the images I had a page number which was relatively large so that it is easy to see for the readers along with a short description of what it is about. I made the font of the numbers the same as the numbers in the content list as this will create consistency and make it look more professional. The font of the short description is the same as the heading 'contents' so that it again creates consistency but also looks different to the text in the contents list.

Next to the page number I had the website name. I first placed the website on the A-Master page so that it will be in the same position for every page as it is automatically there on every page once I put it on the A-Master page. This creates consistency and also saves times which makes it very useful to use.

Sunday 10 November 2013

Front cover, contents page and double page spread sketches

These are my initial sketches for my magazine front cover, contents page and double page spread.

Front cover: I first sketched out the ‘masthead’ at the top of the page as it is conventional to position it there as it is the first place people usually will look at after the image perhaps. Afterwards I roughly sketched out the image of my front cover artist. I then gradually added in the sell lines around the image as this is also a conventional feature of magazines. I made a variety of different types of sell lines including the main sell line as well as a circle box for the plug. For some of the sell lines I added in a couple of words to suggest what kind of sell line I would have there e.g. ‘win tickets’ and ‘top 20’ as I had not decided what sell lines to have yet. Lastly, I added other information which included the issues number, price and barcode. These are small details but essential on a magazine.


Contents page: I firstly took a look at some contents pages to get some inspiration. I found one contents page from ‘Total film’ and borrowed the main layout and sketched mine. Although it is a film magazine but I think the layout would be suitable for my music magazine as it is organized but also interesting. I firstly wrote ‘contents’ at the top of the page and then drew out the boxes of where the contents will go as well as the images. I then added in a small box for the image of the front cover in the left hand corner as this is commonly seen on contents pages. I then drew out a social media box where I will have information for the magazine’s social media websites such as Facebook and Twitter. Finally I added in the details such as the page number and website. I labelled each of the boxes as I went along to ensure that it is clear what I was sketching out.


Double page spread: I firstly wrote the title at the top of the page as it is an important feature of a double page spread and one of the first places which people would look at is usually the top left. I then added in the boxes where I would have an image and also the ‘box out’ text. I then added in the columns for the article text and included details such as a drop cap and pull quotes. This would remind me of the important small features when I create my magazine. Finally I added in page number and website at the very bottom right corner of the page as it is not as important.


Contents Page Text

Media - Contents List by fionawongmedia

Tuesday 5 November 2013

Production Diary 9 - Creating the layout of the contents page and contents text

5th November 2013

This week we started to create the layout of the contents page, double page spread and front cover of our magazine. We did some sketches of the layouts on paper first so we had an idea of what to do when we do it on In Design.

Before we started the task we were given a brief demonstration of how to create it by our teacher. We learnt some shortcuts which would be useful for us to know and these included changing size of things (Ctrl+Shift+>or<), copying something (Alt+drag), toggling layout (w) and selecting everything (Ctrl+A). We also got taught how to make fixed styles for certain text (e.g. title, subheading etc.) by using the paragraph styles section.

We first set up the page and set the settings to 7 pages and 3 columns. After that we started to create the layout of the pages by using text boxes and black boxes. The black boxes we drew represented the images we plan to put in later on. As for the text, we put in place holder text -which was random text that helps you get an idea of what it would look like when you put your actual text in -as we haven’t written the article or contents list yet.

To make the layout of my contents page I found a very good example from Total Film magazine. Although it is not a music magazine but the layout of the contents page is very good and so I decided to make mine similar to that because I believe it is quite successful. I did a similar layout by having images and text in a similar position.
We used the fonts we downloaded before to experiment with, for the masthead, headings subheadings and text. This would help us in making the real magazine as we can experiment with the different fonts for each thing and choose the most suitable one. I decided to have only a couple of different fonts so that there is consistency within my magazine to make it look professional.

For homework, I did the contents text which was the list of contents for the contents page. I made 2 different sections for it: on the cover, features and regulars. For each of these categories I wrote about 6-8 different ideas. I also included an artist index which had the names of different artists and the page number they are featured on. Finally I wrote a couple of lines in a subscription box I made.